Expandable Lightning Component
What do I mean by an “expandable” lightning component? Well, what I mean is a lightning component whose content can be “expanded” to include another component by specifying the NAME of the second component when placing the expandable component on a page. You must be thinking, “why would I want to do that ?” So, let me tell you why I did and maybe that will make you think of somewhere you could use this technique.
I was recently requested to develop a lightning component that would display hyperlinks to navigate to reports. This component was required on the Account, Campaign and Contact Object pages, each requiring different reports and passing different parameters to these reports. So, I created a custom metadata type to hold the report names and parameter information for each Object. My lightning component queried the custom metadata type to find all the reports required for the “current object” which was accessible by implementing the “force:hasSObjectName” interface in my component. This is what my component looked like on the page:
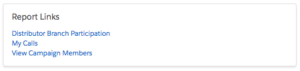
All this worked beautifully until there was the need for a report that was just a LITTLE different. The parameters being passed to this report would need to change based on certain field values in the record. Clearly, my current component could not handle this, but I wanted to display the link to that “special” report as part of my component. How could I do this?
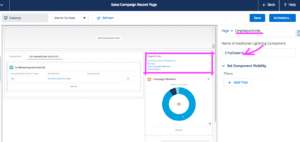
My solution was to make my component “expandable” by adding an attribute (addComponentName) to hold the name of another lightning component. My component CmpReportLinks has a design attribute for addComponent with the label “Name of Additional Lightning Component” that allows us to specify the name of the other lightning component at runtime. This makes it possible to have different “special” reports for different objects by creating a component for each one of them and specifying the component names when placing CmpReportLinks onto the page layout (shown in the picture below with the name set to CmpExpand)
Once I do this, the component now renders like this:
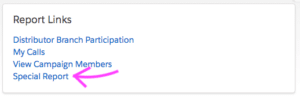
As you can see, the additional link “Special Report” has been added at the bottom.
I am sure you are itching to see the code, so here goes:
This is the original component:
<aura:component
implements="force:hasRecordId,
force:hasSObjectName,
flexipage:availableForAllPageTypes"
controller="CmpReportLinksCtrl">
<!-- List of objects containing information on hyperlinks -->
<aura:attribute name="lstReportLinks" type="Object[]" access="private"/>
<!-- events -->
<aura:handler name="init" value="{!this}" action="{!c.doInit}" />
<div class="slds-card">
<div aura_id="parentDiv" class="slds-p-around_medium">
<!-- heading -->
<div class="heading slds-m-bottom_small">Report Links</div>
<! -- list of hyper links -->
<aura:iteration items="{!v.lstReportLinks}" var="link" >
<ui:outputURL value="{!link.reportUrl}"
label="{!link.reportLabel}"
target="_blank"/><br/>
</aura:iteration>
</div>
</div>
</aura:component>
As you can see, this is pretty simple. In the “onInit” event, I populate “lstReportLinks” with information about the label and url for the reports that are to be displayed for the current object and use <aura:iteration> and <ui:outputURL> to display the hyperlinks.
Here is what I added to the component to make it “expandable”
 <!-- name of component to append -->
 <aura:attribute name="addComponentName" type="String" access="public"/>

 <!-- to append component in 'doneRendering' event ONLY once -->
 <aura:attribute name="isDoneRendering" type="Boolean"  default="false"/>

 <!-- events -->
 <!-- append to component in doneRendering event -->
 <aura:handler event="aura:doneRendering" action="{!c.doneRendering}"/>
Of course, the magic happens in javascript. I need to create a dynamic component and append it to “parentDiv“. I cannot do this in the “onInit” event because my component will not be rendered yet, so I will not be able to find “parentDiv” to append to it. Therefore, I need to do this after my component is rendered using the “doneRendering” event. But, this event fires multiple times in the component life cycle, so I need to make sure that I append the dynamic component ONLY ONCE. Here is the code for the “doneRendering” event in the controller:
doneRendering : function(component, event, helper) {
    if(!component.get("v.isDoneRendering")){
        component.set("v.isDoneRendering", true);
        helper.hlpDoneRendering(component);
    }
},
So, this will call the helper method “hlpDoneRendering” ONE time once the main component has been rendered (by setting “v.isDoneRendering” to true)
And, here is what “hlpDoneRendering” does:
var addComponentName = component.get("v.addComponentName");
if(!$A.util.isEmpty(addComponentName))
{
    addComponentName = 'c:' + addComponentName;
    $A.createComponent(
        addComponentName,
        {
            "aura:id": "addedComponent",
            "recordId" : component.get("v.recordId")
        },
        function(newComp, status, errorMessage){
            //Add the new component to the parentDiv
            if (status === "SUCCESS") {
                console.log('create Component Success');
                var target = component.find("parentDiv");
                var body = target.get("v.body");
                body.push(newComp);
                target.set("v.body", body);
            }
            else if (status === "INCOMPLETE") {
                console.log("No response from server or client is offline.")
                // Show offline error
            }
            else if (status === "ERROR") {
                console.log("Error: " + errorMessage);
                // Show error message
            }
        }
    );
}
Basically, I create a dynamic component using the name provided in the “addComponentName” attribute and append it to the “parentDiv” div.
In order to make this configurable at runtime, I added a design attribute for “addComponentName“.
<design:component >
    <design:attribute name="addComponentName" label="Name of Additional Lightning Component" />
</design:component>
Finally, here is the code for the CmpExpand component that I specified for addComponent:
<aura:component description="CmpExpand" controller=""CmpExpandCtrl>

    <aura:attribute name="reportUrl" type="String" access="public"
                    description="Url for the special report"/>

    <ui:outputURL value="{!v.reportUrl}" label="Special Report" target="_blank"/><br/>
</aura:component>
It simply has one report link.
I certainly enjoyed using dynamic lightning components to solve the problem of my “special” report. Please post below if you find other uses for this approach. If you need help with developing custom lighting components for other uses, we can help.