5 Simple Report Features You Might Not Be Using (But Should Be)
For any user that reads or builds reports in Salesforce, this blog is for you. These five simple tips to report building in Salesforce take only seconds to perform but have a powerful punch. Practice these and to make your reports (and yourself) go the extra mile.
1. Exception Reporting and Cross Filters
 Before the Cross Filter feature in the Report Builder, you would have to massage data in Excel in order to to create exception reports. Thankfully, those are the days of old.
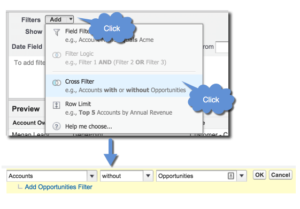
Scenario: Your manager wants to see how many Accounts have no associated Contacts. By “Filter” on the Report Builder click the down arrow next to “Add” and choose “Cross Filter.”
You can do a great deal more with Cross Filters – check out this how-to from Salesforce.
2. Pinning Folders
An often overlooked time-saver is the ability to pin report and dashboard folders to the top of your list on the Reports tab. This is especially useful if your organization has a lot of folders to sift through or you want to remind yourself which folders need your regular attention.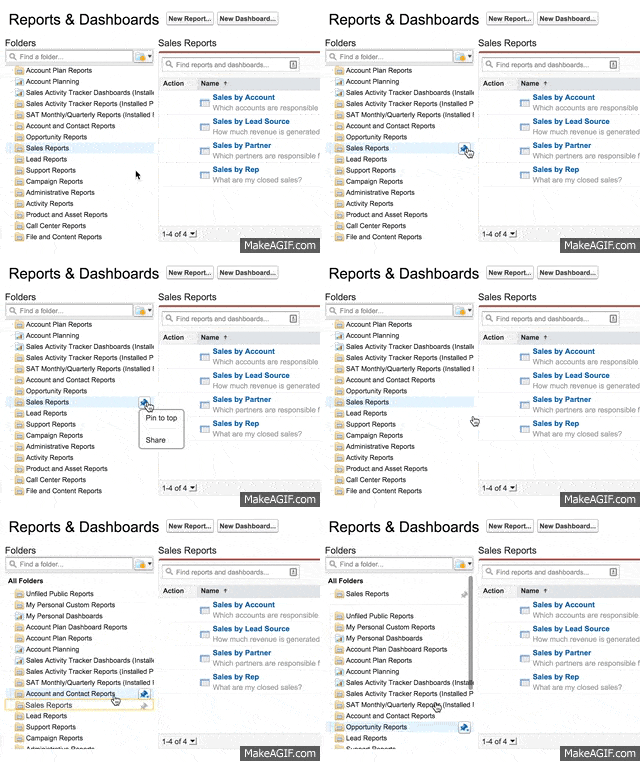
3. Schedule Reports
Salesforce reports give real-time insight into your data and custom list views 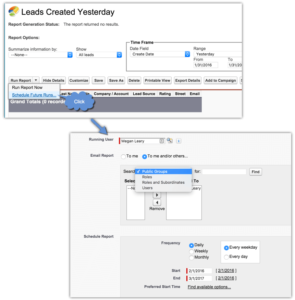 are invaluable tools to keep track of your workload and tasks. But a prudent manager knows that sometimes additional exposure and emphasis can help drive behavior.
Scenario: The Sales Manager wants all reps to receive a list of Leads created the day before by email every morning. Navigate to and run your report “New Leads created Yesterday.” Click the down arrow next to “Run Report” and click “Schedule Reports.” Fill in the details then prepare your back for pats.
Other great recipients of scheduled reports are executives who may not log into Salesforce everyday. Send your CEO this week’s big wins or monthly Campaign ROIs to your CMO.
4. Bucket Fields
If 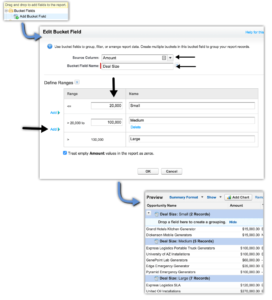 you find yourself creating custom formula fields for report utilization, you may not be taking full advant
age of the Bucketing feature of reports. Buckets let you group your data into categories with ranges that you define. The business use cases for Buckets are endless, but let’s look at the following scenario to get a sense of how simple yet powerful buckets can be.
Scenario: The Sales manager wants to group Opportunities by deal size – small, medium, and large – in order to help focus the sales team on deals more worthy of their time.
Add the Bucket field to the preview pane, choose the field to bucket and determine the parameters. Be sure to group by the Bucket field to bring your categorized records together.
Bucket Fields can do amazing things. Check out the Salesforce Help page for more information.
5. Filter Shortcut
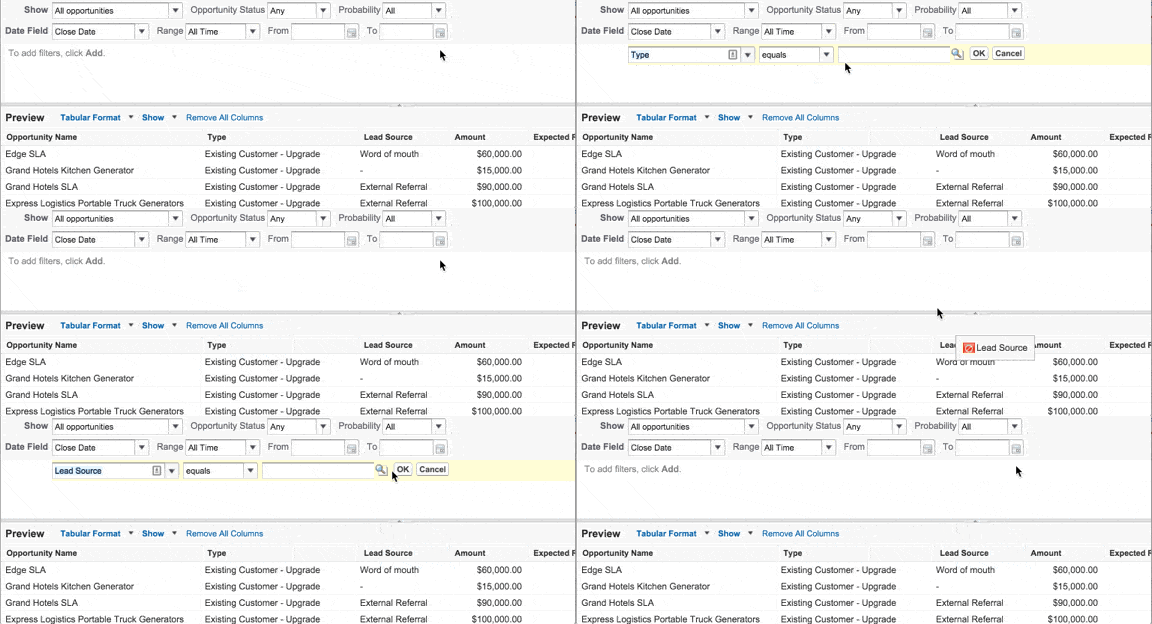
In the preview pane on your report builder, drag and drop the title of the column to the filter area to filter on that field. It’s a quick, interactive shortcut that I use almost every time I create a report.
The simple tricks above barely scratch the surface of the powerful features of Salesforce Reports and Dashboards, the real crown jewel of Salesforce. The ability to slice and dice real-time data and make it visible in a meaningful way adds immeasurable value to your business. Are you taking full advantage of this tool?
OpFocus offers a deep dive into all Report and Dashboard features of Salesforce, going over every switch and lever. It is a hands-on course with group and individual exercises. It also covers more advanced topics like Report Types, Joined Reports, Summary Formulas, and Historical Trending. It concludes with an introduction to Salesforce Wave.
Contact us to learn more and to join us at our Burlington, Massachusetts office for our 2-Day Salesforce Hands-On Reporting Workshop.
