How to Publish your App to the AppExchange
The details outlined in this How To document are expanded from the Salesforce Help guide on publishing apps and services.
In order to publish your App publicly on the AppExchange, you must be a Salesforce partner. If you’re not a partner, visit the Salesforce Partners site to learn more.
Enable and Setup the Environment Hub
By default, when you create your APO (AppExchange Publishing Org) the main organization (environment) that you utilize will be linked. This could be your production environment where you don’t perform development of Apps.
If you want to create an additional environment in which you will develop and maintain your app, you’ll need a new ORG.
NOTE: A sandbox is considered an instance, where as an Org is not and therefore can be connected to the APO.
To create a new Org and link it to your APO, follow these steps:
- Log a case with Salesforce to enable your environment hub
- Once done, confirm your profile permissions have “Manage Environment Hub” and “Connect Organization to Environment Hub” turned on
- Also, ensure that the “Hub” object tab is set to Default ON.
- Access the ‘Environment Hub’ App through the App Launcher and click on “Environment Hub”
- Click on the “Create Organization” button and select the type of Org you want:
- Development — Development organizations for creating and uploading managed packages.
- Test/Demo— Trial organizations created for test and demonstration purposes, similar to organizations created from www.salesforce.com/trial. You can specify a Trialforce template for creating trial organizations. This enables you to configure and test exactly how your prospects experience the trial.
- Trialforce—You can create Trialforce Source Organizations (TSOs) from the Environment Hub, as an alternative to using a Trialforce Management Organization (TMO).
- Once your Org type is selected, fill out the details for your Org.
- Once done, click ‘Create’.
Access the Publisher Console
Log into the AppExchange, and under your profile drop down button (top right corner) select “Publishing Console”.
You are brought to your Publisher Console.
Link to your Development Organization
- The first thing you want to do is link the organization that you want to promote your packages from. This should be a developer org.
- Click on “Your Organizations” and click on the “Link New Organization” button.
- Enter in the login details for the ORG that you just created (above) and hit OK.
- Once the organization is linked it will appear in the Linked Organizations list.
Create a Package of your App
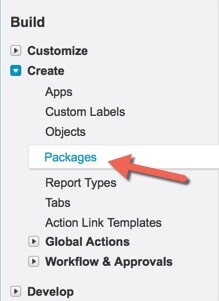 In your development sandbox where your application has been created,
click on Setup > Create > Packages, and click on the ‘New’ button.
- Create a name and fill out the other fields if required, then click save.
- You’ll then be required to add components to the package. This is very similar to creating a change set in which all components related to the App must be included in the package (reports, apex, buttons, everything).
- Once your package is complete, hit the ‘Upload’ button and provide your package a name and set the version number (this is important so you are able to identify it when creating a listing.)
NOTE: If you are creating a package that will become a public App on the AppExchange, please consult the “Preparing Your Apps for Distribution” guidelines found on the Salesforce Help site. This link has a bunch of steps and tips to ensure your App, your listing, and the whole package is solid and works perfectly (aside from the actual functionality of the App itself).
Once the rest of the information is filled out, hit the upload button and the App will be pushed to the AppExchange.
When this process is complete, you’ll have the Upload Complete notification.
If you wish to install this Package to another Salesforce Org, you can do so utilizing the Installation URL provided. Else, to publish to the AppExchange, log into the AppExchange with your publisher login and create your listing.
When you log into the AppExchange, your uploaded packages will be listed in the ‘Uploaded Packages’ section on the Publisher Console.
Create a Listing and Market Your App
To create a listing, on the publishing console page click on the “Create New Listing”.
NOTE: Your listing name must be unique.
Once created you’ll have a variety of options to classify your listing and describe it so that those who find it on the AppExchange can read what your App is all about. Remember that this is what the users will see when they find your App on the AppExchange, so make it enticing and complete for potential users to want to use your application.
Under the ‘Offering’ Tab is where you will select the package which will be downloadable by users of another Salesforce organization.
The rest of the tabs are outlined as follows:
- Pricing – where you set if your App has a cost and enables you to sign up for the checkout service tied in with Salesforce
- Specs – outlined the requirements in order to run your App successfully, such as Salesforce editions and languages
- Support – this is where you can outline the type of support you offer and how those who download/install your app can get in touch with you
- Uploaded Content – any logos, screenshots, and videos about your App can be uploaded here and used in the listing
- Leads – this is where you can specify how you want to receive leads on users that have accessed you application in a variety of ways:
- When your app is installed
- When your app is taken for a test drive
- When your app’s demo is viewed
- When a user sign’s up for a free trial of your app
NOTE: Ensure you go through all tabs and fill in the require fields as these are necessary for your listing to be public.
Once you are done, simply click on the Listing link in the top left hand corner to see the actual listing that would appear in the AppExchange. (To return to the Publishing Console, click on the drop down in the top right hand corner and select Publishing Console).
Once your listing is complete, you must return to the Publishing Console and select the ‘Your Private Listings’ tab to find the created listing.
Here you will see the status of completion for your listing and can click edit to make changes as necessary. You can click ‘Make Public’ at this point to confirm you’ve filled in all of the required fields, but you won’t get very far until your App has been cleared by the Salesforce security review.
Submit Your Listing for Security Review
Because you are submitting an App on the AppExchange, your App must go through a security review.
When your package is uploaded and part of a listing, it will have a ‘Start Review’ link under the Security Review section.
To start the review for a packaged app, follow these steps (which are also outlined on the Salesforce Help website:
- Click Start Review in the package’s Security Review column on the Publishing home page or click Start Review on the Offering tab when editing the listing.
- Select whether you charge for your application or if your application is free. Free applications must complete the review, but the review fee is waived.
- If you charge for your application, Partner Operations will email you information within two business days on how to pay for the review. This is an annual payment.
- Indicate if your application integrates with any web services outside of Force.com, including your own servers.
- If your application integrates with other web services, list all of them in the Webservices Used box. You can enter up to 1000 characters.
- If your application integrates with other web services, select how your application authenticates with those services. Enter any helpful comments in the box provided. You can enter up to 1000 characters.
- Indicate if your application stores Salesforce.com user credentials outside of Force.com.
- Indicate if your application stores Salesforce.com customer data outside of Force.com.
- If your application stores Salesforce.com customer data outside of Force.com, list all Salesforce.com objects accessed in the Objects Accessed box. You can enter up to 255 characters.
- Indicate if your application requires that customers install any client components, such as software or plug-ins.
- If your application requires client components, enter the details in the Requirements box. You can enter up to 1000 characters.
- Click Start Security Review to start the AppExchange Security Review. To discard your changes and return to the previous page, click Cancel.
Once you click “start review,” a member of the partner operations team will email you the next steps within two business days.
Publicize Your App
After your app is approved, click on the ‘Make Public’ link next to your App listing in the Publisher Console.
Support Your Users
Once your App is public, support your users by answering questions and providing insight on how your App can help them. Address concerns, update your App regularly, and building a trusting client base.
Most of all, have fun.