Lightning Design System Tricks and Tips
I recently had the opportunity to build several Visualforce pages paired with the Lightning Design System (LDS). While I learned a lot, I also hit some bumps along the way. At OpFocus, whenever we have a learning experience like this, we are encouraged to share with our peers…so that’s what I’m doing in hopes that someone in the Salesforce community can learn from my mistakes!
New Model and Architecture
Switching from Visual Force pages to Aura pages requires several major changes.
- Replacing Apex tags with straight HTML tags and/or aura tags, requiring more HTML and Javascript knowledge and experience
- Discourages use of controller methods in favor of Javascript remoting
Creating a Visual Force page with the LDS is an excellent stepping stone for transitioning from classic Salesforce to Salesforce Lighting Experience. In Visual Force, the use of apex tags makes the work of conditionally rendering and formatting content simpler but we can still take advantage of that – read on!
Apex tags
Only a subset of apex tags is actually supported when building a Visualforce page with Lightning Design System. These are the ones I recommend you use:
apex:page(required for Visual Force content)apex:outputPanelto render content conditionallyapex:repeatto iterate over a collection of objects
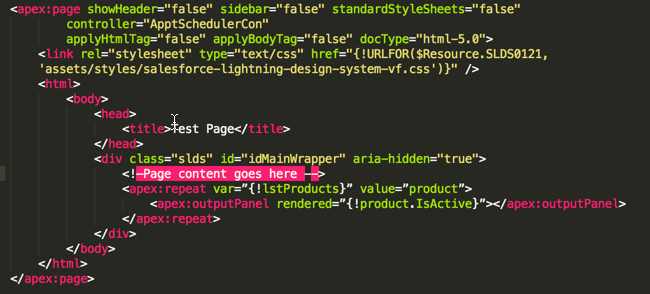
Here is the skeleton of a Visualforce page for use with LDS.
Sharing Data between page and controller
When you load a page, typically, in the constructor, the necessary data to populate your page is retrieved from the database. In classic Salesforce, once the page is loaded and rendered, you still communicate using controller variables and action methods for getting and setting the data. However, with the new model, we are using Javascript remoting methods (which are static so do not have access to controller instance data). How can we communicate with the controller easily? Use JSON – it is your friend!
You need to maintain more of your view state/page state in the page itself using Javascript. An approach that works well is to grab all your data values and encode them as JSON strings, returning them to the Page as a String property. Then within the page init method, you write Javascript to decode these values and store them in a Javascript array. Similarly when you send data to the server’s JS remoting methods, JSON-encode your data.
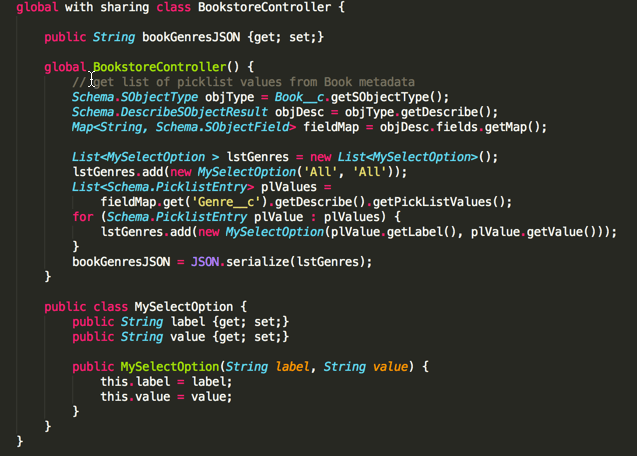
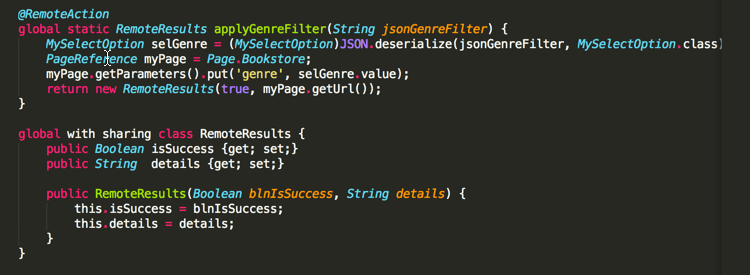
Let’s look at an example. Say that you have a bookstore website and you want to provide the user the ability to select different genres of books. To accomplish this you need a picklist to populate on the page. Since we do not have apex:input to use in the page, we need to create and populate the raw HTML elements ourselves. Here is the controller code:
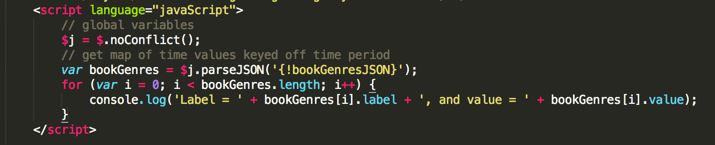
Then in your page, through the use of jQuery, you deserialize your string and you have an array of MySelectOption objects. In the interest of brevity, I have only included the script to parse the JSON. Once it is parsed, you use the global Javascript variable bookGenres to populate your element in conjunction with a handlebars template or with straight Javascript – I will leave that part up to you.
Now – how do we communicate back to the server when user makes a selection that we need to save/process. Once again, we look to JSON to help us out.
We invoke the JS remoting method passing in JSON strings of the data that we need. Rather than sending instances of SObjects back and forth, I would recommend that you create a simplified version of the SObject in question that you send back and forth. I had issues when I tried to just use my custom object due to the additional fields used by Salesforce.
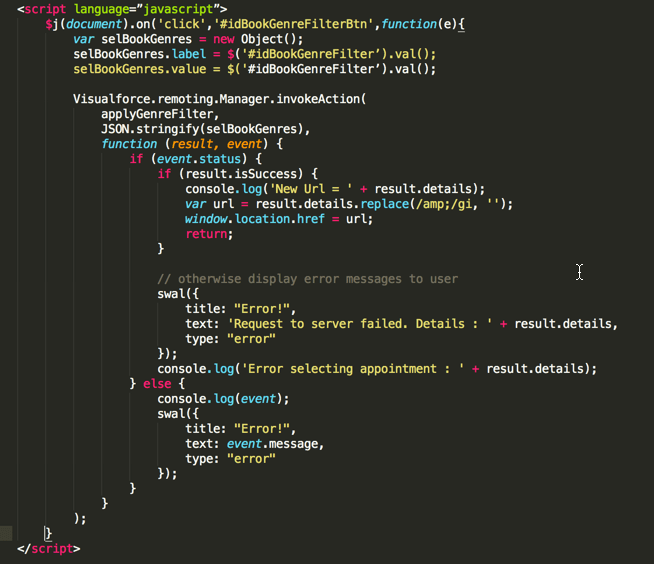
Using our bookstore example, we see that we are sending selBookGenres which would be the list of the genres the user has selected for filtering the books. This would be created in Javascript once the user has made their selection and then sent to the server as follows (assumes your select element has id=idBookGenreFilter and that the button to apply the filters has id=idBookGenreFilterButton).
Then in your controller, adding to what we defined earlier is your remote method.
LDS Quirks
Working with the Lightning Design System in its infancy means there are hiccups along the way as is inevitable with any system. Here are a few of the ones I came up against that I thought were worth sharing.
Modal Dialog
- Only regular and large are available, there is no small.
- For a regular sized modal, use
class=slds-modal - For large sized modal, use
class=slds-modal-large
- For a regular sized modal, use
- Additionally, there is no way to specify the size in pixels or percentage of viewport.
- The modal dialog box is also not resizeable – it automatically resizes when the viewport resizies.
- When a dialog box is rendered, the main page fades in the background so the modal can take center stage. Figuring out how to do this is not immediately obvious. Here is how it is done.
Define your modal with the following class hierarchy (for a regular sized one):
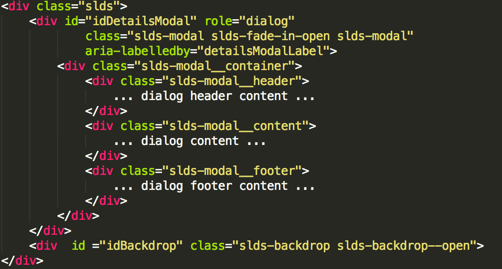
The ordering of the div elements is important for the fading to work. When the dialog box is opened, the class slds-backdrop—open is turned on which is what we want. But, when dialog box is closed, we need to toggle that class off by calling this in your Javascript that handles the cancel or close of the modal dialog box
$j('#idBackdrop').toggleClass("slds-backdrop--open");
Sizing Helper Classes
For the most part the sizing helper classes provide what you would expect and desire with a few interesting points.
- You can only specify 2 sizes for an input field. (regular and small) as follows:
class=slds-inputclass=slds-input-small
- Sizing helper classes:
size-1-of-2is the same assize-2-of-4in that 50% of the viewport will be used up. In the first case, by a single column in the grid, in the second case, by two columns in the grid.- Do not specify more columns than you have in your grid otherwise the results are unpredictable. ie.
size-1-of-3andsize-3-of-3which add up to a total of 4 columns.
Button element in a Form
If you use slds-form, remember that the native HTML element button has by default a type="submit". This means that when the user clicks on the button, the page will submit the form data to the server. Assuming that your button is intended to send data to the server rather than execute a Javascript action, we want to use Javasript Remoting which means do not use the form’s submit action. Instead, we need to specify type=”button” for the button and then handle the click event with a Javascript function.
For those seasoned HTML and Javascript developers out there, this is a no-brainer. But for Apex developers without that experience, this is different from Visualforce and Apex buttons. So be warned – this threw me for a loop for several hours – I couldn’t understand why my form was being submitted twice – once without the proper form data.
LDS Reference in Pages
Keep your LDS library/static resource current – new releases are frequent! To see if you have the latest release, go to https://www.lightningdesignsystem.com/ and it shows the latest release number on the main page.
Salesforce recommends as a best practice to name your LDS static resource with the version number in the name so you always know what version you are using in your pages. This does make sense, however it does mean that with each new version, all references to the Static resource will need to be renamed. I would recommend putting all your resources (stylesheets, Javascript, 3rd party library references) into a component that you then include in your pages – that way you only need to update the name and path information in a single place, much less error-prone.
Third Party Components and Javascript Libraries
As mentioned several times, the need to know Javascript when developing pages on the new Lighting Experience is critical. Thankfully there are many Javascript libraries that complement a Lightning Visualforce page to do the work for you. Do not hesitate to use them with caution!
- JQuery – it goes without saying that this is a must. (JQuery)
- LDS Datepicker is not ready for prime-time so I used Bootstrap Datepicker. One word of caution is that you need to ensure you preserve the LDS look&feel as LDS has a similar class structure to Bootstrap so you need to apply LDS class styling to the Datepicker elements carefully.
- Handlebars Template library is a great tool for dynamically rendering different page elements depending on user selections. (Handlebars Templates)
- Sweet Alerts – notification popup windows. For now, I use sweet alerts (Sweet Alerts)
- The lack of Javascript logic and server support for Salesforce lookup components is the one area that requires the most work from us developers. This was previously handled for us with the Visualforce apex:input tags. Thankfully there are a number of folks out there who have already forged the way ahead by creating reusable Lightning lookup components that can be used from within Visual Force pages. This is the simplest one to integrate: Lightning Lookup Component
- A few notes of caution and/or corrections
- The
startsWithattribute is not actually used if you specify server search. To have it usestartsWithwill require changes to Javasript controller and helper code - A client-side search is faster than server-side search
startsWithis faster thancontainssearch
- The
- A few notes of caution and/or corrections
I hope my trials and tribulations will be of help to others out there as they pave the way down the Lightning Blaze. Happy Trails!!