How to A/B Test an Email in Marketo
 In order to maximize the investment in your Marketing Automation system, you should be optimizing the effectiveness of your email marketing efforts. I’m going to show you how to set up a simple A/B Test on an outbound Email in Marketo, my example will be testing 2 different Subject Lines.
1 – Start by building a Program as you normally would
Here’s a quick overview in case you forgot:
- Create a new Program (Channel: Email Blast)
- Create a Smart List as a Local Asset, and use this to define your Audience
 Build Smart Campaigns to alter the Program Status’ based on Email Activity
- Sent, Bounced, Opened, Clicked, Converted, Unsubscribed
- Group these Smart Campaigns into a Folder underneath the Program
- Create the Email as a Local Asset
- Create a Send Emails Smart Campaign as a placeholder (we will finalize the flow later)
- You should end up with a Program that looks something like the image on the right
2 – Devise plan of attack for your A/B test
Now’s the time to get creative. What do you want to test? Here’s a few ideas to get you started:
- Subject Line
- From Line
- Time of Day
- Personalization in Subject
- Images
- Colors
- Content
Use your imagination, the sky is the limit. If you’re hard up for ideas, Optimizely has a nice article with 71 Things to A/B Test.
3 – Clone your Email
Once you decide on what you are going to test, Clone an exact copy of the email that you created in step 1. I like to name the 2 local emails Email A and Email B. In your Email B, implement the “test” whether it be Subject Line, From Line, or Content within the email itself. Your A/B Test should only be focused on 1 distinct variable (if you want to test more than 2 variables look into multivariate testing). Once you’ve finalized your changes to Email A and Email B, make sure you Approve the Emails.
4 – Send Emails
Now, locate the “Send Emails” Smart Campaign you built in Step 1. You will need to reference your Audience in the Smart List tab by dragging a “Member of Smart List”. Even though we are doing an A/B test, we still want to send all members of the Audience over to the Flow tab. 
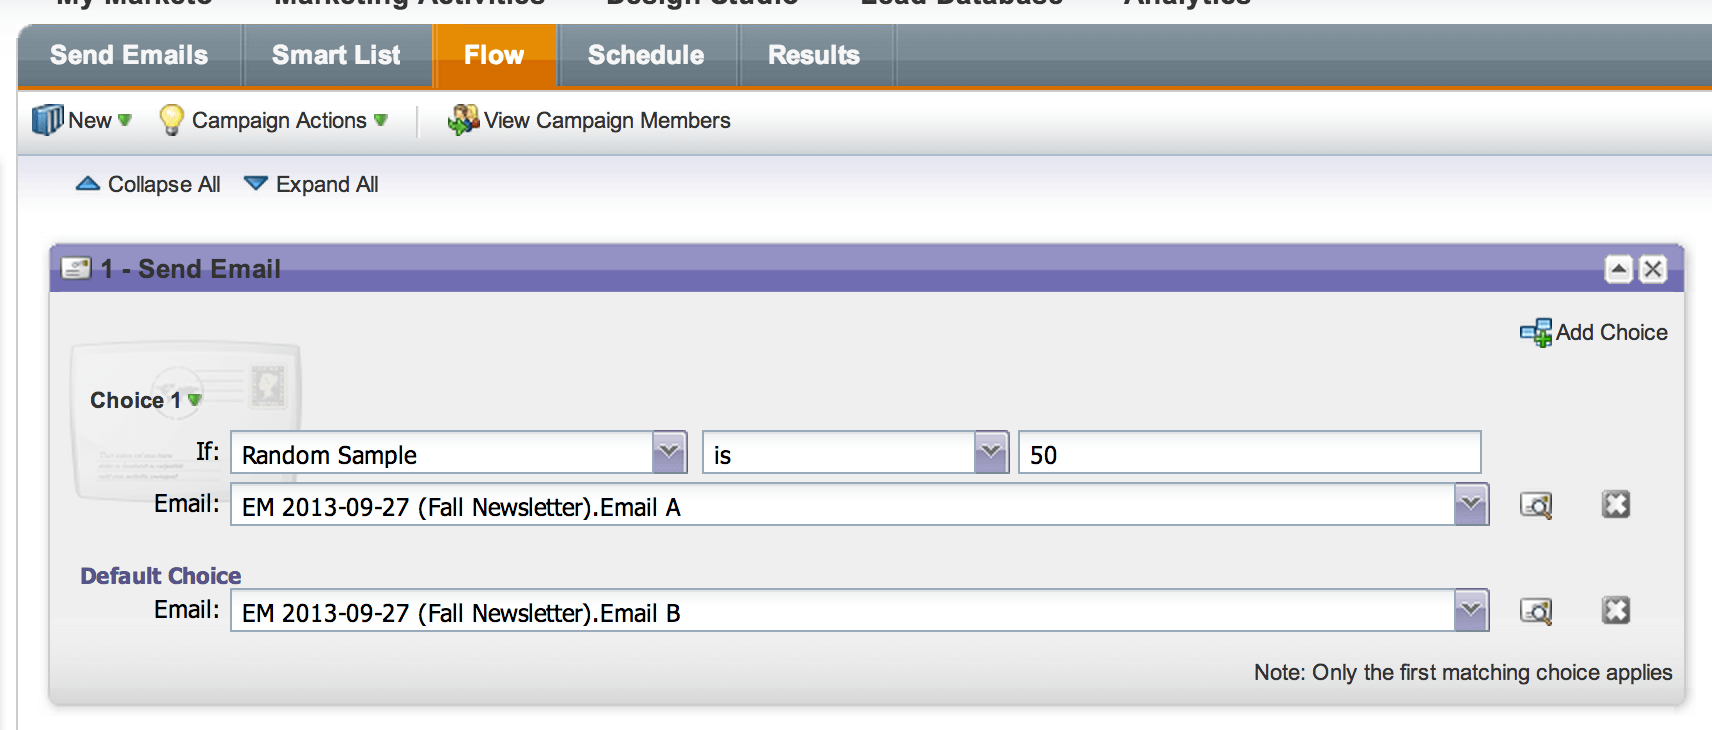
In the Flow tab, start by dragging a “Send Email” flow action over – and the click the “Add Choice” button. The purpose of the choice is to split our Audience in half, to accomplish this simply set the choice to Random Sample, is, 50. Then set Choice 1 to receive Email A, and the Default Choice to Email B. In layman’s terms, take 50% of our target audience and send them Email A, send Email B to everyone else:
5 – Report
The whole point of doing an A/B test, is to be able to take away actionable insight and choose a winning variation of your test. Once you’ve run a number of A/B tests, you can join the winning variations together to make the perfect concoction of an Email. There are 2 ways to quickly see the results of your A/B test, you can either click on the Email tab of the Smart Campaign you used to send the emails, or use a Marketo Report. Both options will display the results of your in this format:
I would have chosen Email B as the winning variation in this email Test considering that Email B had a higher Open Rate and a lower Unsubscribe Rate, the difference in click rates were negligible, so Email B is the winner.
If you have further questions about A/B Tests, feel free to drop a line in the comments section.
Picture Credit: http://upload.wikimedia.org/wikipedia/commons/b/bb/Super-Famicom-Controller.jpg

