Creating and Deploying Packages in Salesforce
For those rare instances when promoting a change set from one environment to another is not possible (perhaps those two environments are completely different instances of Salesforce), you can still utilize a package to get enhancements pushed through.
Packages offer the ability to put your change set in a little, well packaged bundle and have it accessible for installation via the AppExchange.
1. Create the Package
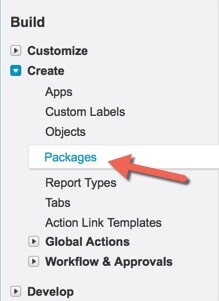
Click on Setup > Create > Packages
Most likely, your package type allowed will be ‘unmanaged only’, which is fine unless you plan on releasing full blown applications to market on the AppExchange.
If you are planning on developing an App to sell and distribute on the AppExchange (even
for free), you’ll want to consult the Understanding Packages page on the Salesforce Help site.
Click on New to create your first package.
Give your package a name, and a description. If there are any apex triggers/classes in the package, you may want to set a specific individual (yourself) in the ‘Notify on Apex Error’ section so you can be notified of any issues.
2. Populate the Package with Components
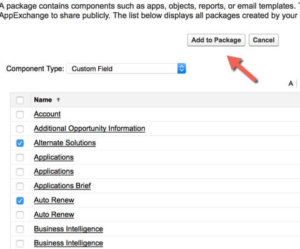
Once you have your package created, you’ll want to populate it with components that you want to promote. This process is identical to creating a change set. Simply hit the Add button and start selecting the components to Add to Package.
Then simply hit the Upload button to start the upload process to the AppExchange.
3. Finalize the Package Details
The next page is where you outline the details on the package, specifically:
- Version name and number
- Links (if any) to release notes and post install instructions
- Password (optional)
- Package requirements outlining components that the receiving environment MUST have configured in order for your package to be installed
- Object requirements notifications on changes to either record types, sharing, field history tracking or feed tracking
For the most part you probably won’t need to set any of the package requirements or object requirements, so you can leave these sections blank.
4. Upload the Package to the AppExchange
When your package is ready, hit Upload and it’ll be processed and pushed to the AppExchange.
Once done, you’ll be notified, and you are provided a URL that links directly to your package. Copy and paste this somewhere as you’ll need it in a little while.
NOTE: This package is not ‘findable’ or ‘searchable’ on the AppExchange; the only way you can access it is through the Installation URL provided.
5. Access your Package from the alternate Environment
Now that your package is available in the AppExchange via the provided link, you need to log out of the current environment, and log in to the alternate environment you wish to install the package into.
Once inside the environment, copy and paste the URL provided for your package and hit enter. If you are in a production environment, you may need to change the ‘test’ to ‘login’ in the URL.
From here, you may be presented with a login screen again, indicating the environment you wish to promote the package too. Once you login again, you are prompted with the package details.
The package, its details, and a list of the components comes up to be verified as being the correct package.
6. Deploy your Package to the alternate Environment
Hitting Continue will initiate the Package Installer ‘wizard’ which will guide you through the steps towards installing the package:
- Step 1: Approve Package API Access – set the requirements and permissions to align with the package requirements
- Step 2: Choose Security Level – set who should be able to utilize/see the components in the package
- Step 3: Install the Package
Once the package is installed, you are presented with a verification message.
Any errors or issues would be outlined at this point for you to take action against.
7. Manage your Packages
Once your packages are installed, you can always managed them by going to Setup > Installed Packages (under Build) and a list of all Packages that have been installed in the environment will be listed.
Have fun with packages!


