5 Steps to Enhance Salesforce Reporting Using Custom Buttons

Ever wished you could generate a Report right from a Record in Salesforce? Been frustrated that a Related List on an Account just doesn’t show all of the Activities or has limited sorting capabilities? The answer can be both simple and effective without requiring the help of a developer. Follow the steps below and get on your way to enhancing your Salesforce instance.
Step 1: Create the Report
First things first, create as simple or complex a Report as necessary to achieve the desired information. Much of the time, a Tabular Report will be sufficient in providing a detailed list, but any Report type will do. Keep in mind the field(s) we want to parse into the Report. For example, if the end goal of this Report is to show Closed Activities for a given Contact, we will want to create a Report Filter Criteria saying “Contact ID = “” (where the “” represents null or blank). This filter will allow us to parse in the ID field from the record that is clicked.

Step 2: Save the Report
IMPORTANT: Save the Report into a Public folder. The Report needs to be accessible by all Users who will click the button so do NOT save this into “My Personal Custom Reports.” Also make sure that Users who will be clicking the button have access to the Report via the Report Folder permissions.
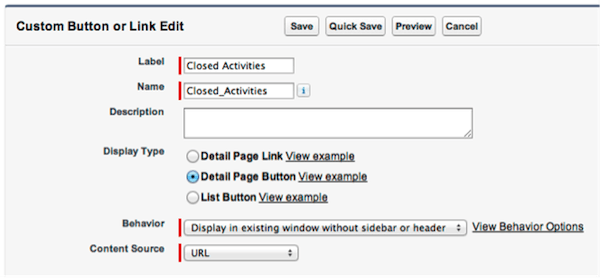
Step 3: Build the Button (a)
Decide which Object the button will be placed on. This should align with the Report Type you created, but is not necessarily required. Click into Setup > [Object Name] > Buttons, Links, and Actions > New Button or Link. Give your button a Name and Description, determine where you want the button to reside on the page, give it a behavior, and leave the Content Source as URL.
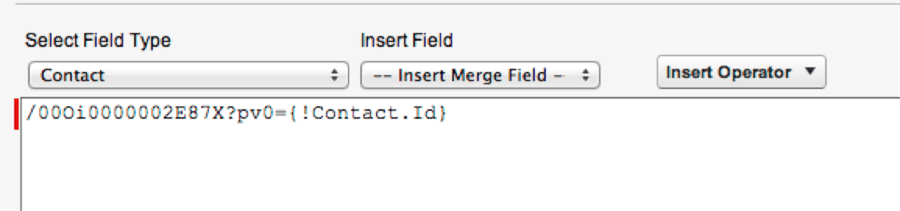
Step 3: Build the Button (b)
In the text box, begin with a backslash and inserting the Report ID. This can be found by clicking on the Report itself and copying the 15-digit ID code at the end of the url. It may look something like this “/00Oi0000002E87X.” Based on how you have set up the Report you can manually parse in specific pieces into the Report filters. After the ID, type “pv0=”. It is important to note that the number that follows the pv refers to the order of filter criteria in the report

The first line is always 0, the second line is 1, and so forth. So in the example above, Closed = pc1, equals = pn1, and “True” = pv1
- pc0 is the Id/Name of the hidden input tag corresponding to the field
- pn0 is the Id/Name of the hidden input tag corresponding to the operator
- pv0 is the Id/Name of the hidden input tag corresponding to the value
Below is an example of what a finished Button may look like to parse in the Contact ID into a Report’s first Filter Criteria
Step 4: Edit the Page Layout
This is important. Just because you created the Button does not mean that you can view it or actually use it until you place in on the Page Layout. Navigate to the Object for which you create the button and add it to the Page Layout(s).
Step 5: TEST!!!
This should go without saying, but Test, Test, Test! Make sure that you have a few examples in mind to test difference scenarios and try clicking the button to make sure that the ID gets parsed into the right field. You can always tweak the Report later, but make sure the Filter Criteria for the blank ID field remains the same, otherwise the Report will fail to work properly!
With these simple steps, leveraging the power of Custom Buttons can greatly enhance your Salesforce without the need for developing code.